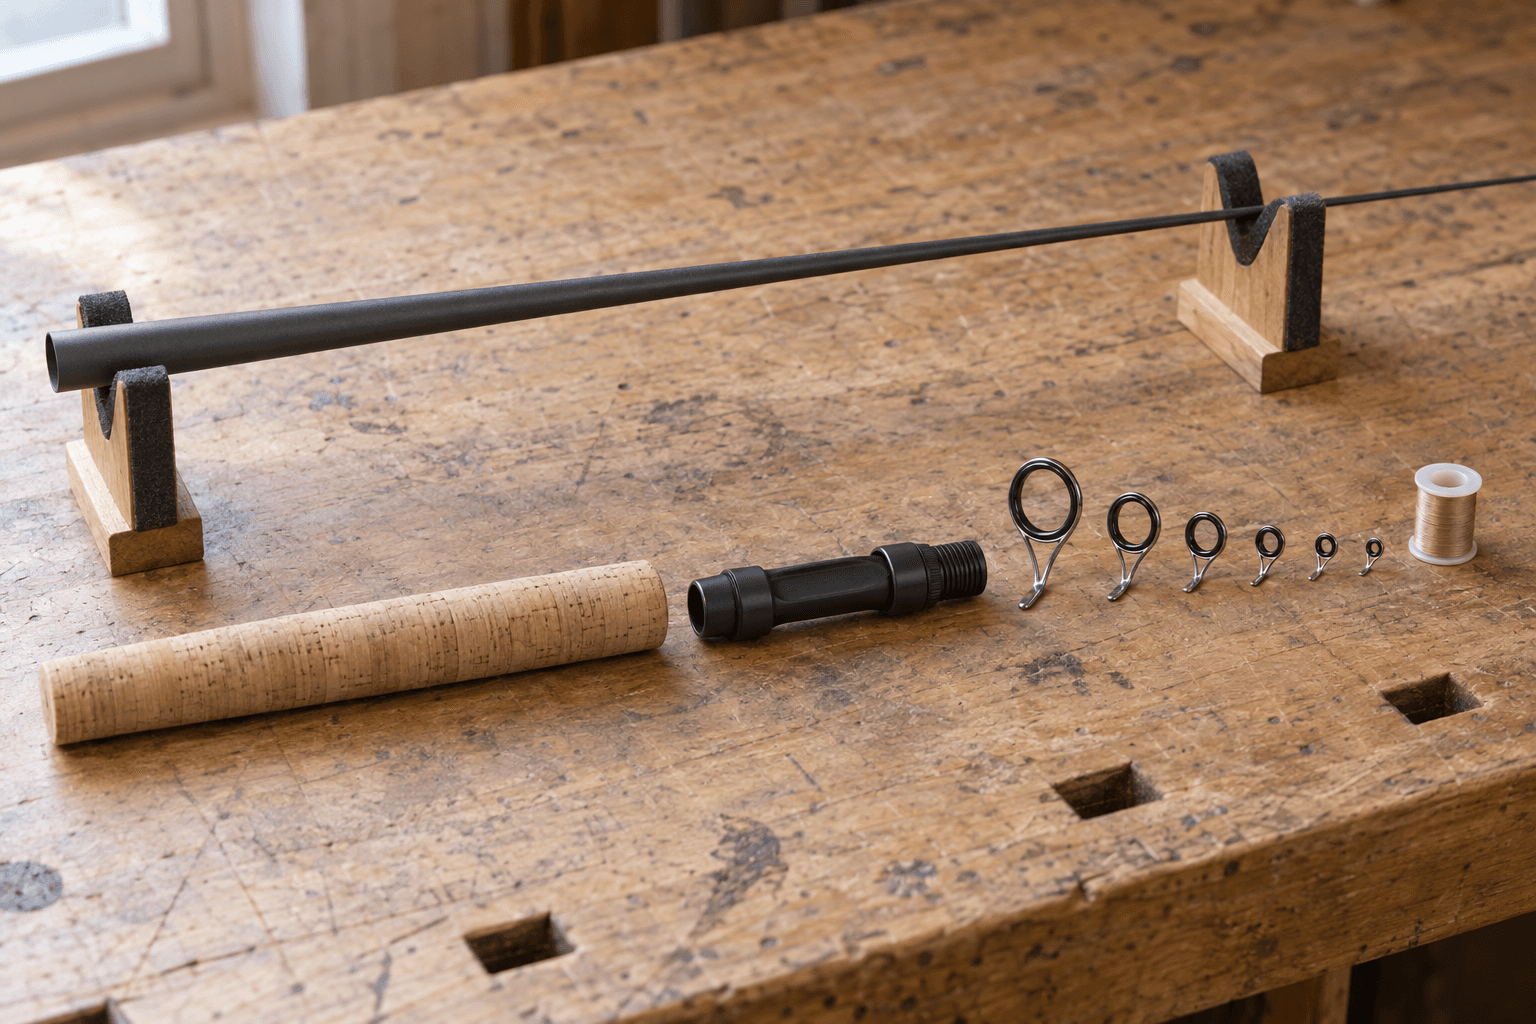
There's a moment every angler eventually reaches — standing at the water, rod in hand, thinking: this doesn't feel quite right. Maybe it's too stiff for the lures you favor. Maybe the grip is wrong for your casting style. Maybe it's simply someone else's idea of what a fishing rod should be.
Building your own rod ends that compromise permanently.
A custom rod isn't just a project — it's the extension of your hand, engineered exactly for you, the water you fish, and the way you fish it. This guide will walk you through every stage of the process: choosing and understanding your blank, setting up glue joints that will never fail, selecting and mounting a reel seat, fitting and shaping grips, placing guides correctly (including how to work with spine alignment), and finishing your wraps for a rod that will outlast anything off a factory shelf.
Whether you're building your first rod or your fiftieth, what follows is the most complete, honest account of the craft you'll find anywhere.
Table of Contents
- Why Build Instead of Buy?
- Understanding Blank Materials
- Blank Construction
- Choosing the Right Blank for Your Rod
- Locating and Aligning the Spine
- Ferrules and Multi-Piece Construction
- Modifying Blanks: Trimming and Tuning
- Glues and Gluing: The Foundation of a Lasting Rod
- Reel Seats: Materials, Types, and Installation
- Grips and Handles
- Guides: Selection, Placement, and How They Shape Action
- Spiral Guide Placement
- Wrapping Guides: Technique and Thread Selection
- Finishing Your Rod
- Building for Specific Techniques
- Final Assembly Checklist
1. Why Build Instead of Buy?
The standard argument for building your own rod — that it will cost less than a premium production rod — is often true but misses the more important point. The real advantage is fit.
No two anglers cast identically. No two fishing situations are the same. A rod designed around the average angler's preferences and manufactured to tolerances that allow for mass production will always be a compromise. The custom rod, built specifically for one person and one purpose, is not.
Consider what's actually possible when you build your own:
- Exact action tuned to your lure weight and casting style. A blank can be trimmed at the tip or butt to shift its action. Guides can be selected and positioned to stiffen or soften the tip section. These are tools no production rod gives you.
- Perfect balance. Counterweight material can be added inside the butt to shift the rod's balance point exactly to where it feels best in your hand.
- Handle geometry built for your grip. Cork can be shaped to any contour. Foam grips can be colored and textured. Split grip designs reduce weight and increase sensitivity. The handle of your rod should fit your hand the way a good knife handle fits — like it was made for it, because it was.
- Components chosen for quality, not price point. Factory rods are built to a price. You choose exactly which reel seat, which guides, which thread to use — and you know what's in the rod.
- Technique-specific optimization. Whether you're building for ultralight baitcasting, offshore jigging, kayak fishing, or long-distance surf casting, every component can be selected for that exact application.
The enjoyment of fishing is enhanced when you're holding something you made. That's not sentiment — it's the consistent report of anglers who've made the transition.
2. Understanding Blank Materials
Everything starts with the blank. Before you can choose one intelligently, you need to understand what the materials are and what they actually do.
Fiberglass
The conventional fiberglass process starts with resin-impregnated cloth cut into a pattern, then rolled under high pressure around a tapered steel mandrel. The orientation of the fibers matters enormously: quality cloth has 75–90% of fibers running longitudinally along the blank's axis, providing the primary bending strength, with just enough cross-fibers for hoop strength. A spiral wrap of cellophane tape is applied over the cloth and applies pressure during curing as the blanks hang in an oven at 300–350°F for 30 to 60 minutes.
Once cured, the mandrel is removed, the tape stripped, and the blank sanded to a finished surface. An unsanded blank is 5–10% heavier but up to 20% stronger, because even the best sanding removes or fractures some exterior glass fibers. Top manufacturers calculate this loss into their patterns and add material to compensate.
The critical distinction between fiberglass types is E-glass versus S-glass. E-glass is the standard material — reliable and forgiving. S-glass has a modulus about 25% higher and a strain rate 38% higher, yielding blanks that are more sensitive, dampen more quickly after the cast, and can be made lighter for equivalent strength. When you're choosing a fiberglass blank, whether it's built on S-glass is the first question worth asking.
Graphite
Graphite is four times stronger than steel by weight and two and a half times stronger than fiberglass. Those numbers translate into three practical advantages: sensitivity, responsiveness, and fatigue resistance.
Sensitivity is graphite's most significant and least understood attribute. Because the material is so much stiffer than fiberglass and requires less of it, vibrations travel from tip to hand with remarkable fidelity. The angler feels the tap of a light bite, the texture of the bottom, the pulse of a lure working through current.
Responsiveness and dampening. Graphite stores and releases energy decisively, enabling tighter casting loops and more accurate delivery. At the end of a cast it stops oscillating almost immediately — eliminating the tip vibration that creates friction against guides and robs distance.
Fatigue resistance. In tests of 30,000 simulated casting flexes, fiberglass softened 8%, bamboo 6%, and graphite less than 1%. A good graphite rod holds its original action far longer than alternatives.
Graphite blanks are roughly fifty times harder to manufacture properly than fiberglass. The entire performance advantage depends on keeping the fibers aligned with the blank's axis. Graphite fiber is only .0003 inch in diameter — about ten times thinner than fiberglass. Wrapping those fibers under pressure around a thin mandrel pushes the mandrel to one side, creating uneven wall thickness and weak spots.
The solution used by top manufacturers is a fiberglass scrim — a very fine, open-weave material placed between the graphite tape and the mandrel. This scrim prevents the mandrel from being pushed into the graphite while adding no meaningful weight or stiffness. Manufacturers without this production capability often wrap fibers off-axis instead, which keeps wall thickness uniform but sacrifices the primary performance advantage of graphite.
Understanding Graphite Grades
"Modulus" measures stiffness — how much a material resists deformation under load. Higher modulus means stiffer fiber, which means less material is needed for the same stiffness, yielding lighter and more sensitive blanks. The tradeoff: higher modulus fibers are more brittle.
The industry uses two overlapping naming systems. The IM series (IM6, IM7, IM8) represents intermediate-modulus grades developed through the 1980s, with IM6 as the workhorse and IM8 pushing into higher stiffness at the cost of increasing brittleness. The Toray T-series (T700, T800, T1000) is the actual industrial standard most blank manufacturers use worldwide — T700 represents a well-balanced sweet spot of stiffness and toughness that appears in most quality mid-range blanks.
Neither system tells you how much resin is present, how fibers are oriented, or how well the layup is engineered. A blank described as "100% graphite" tells you only that graphite is the sole fiber used. A blank with fewer, off-axis graphite fibers in a sea of resin is technically 100% graphite and definitively inferior to one that uses a small amount of fiberglass scrim with more properly aligned graphite fiber. Grade names are a starting point, not a verdict.
3. Blank Construction
The most important advances in blank performance have not come from fiber grade alone. They've come from how blanks are engineered.
Multi-Modulus Layups
The best blanks use several different carbon fabrics, placing each at specific positions along the blank rather than using a single grade throughout. Higher modulus fiber goes in the tip for sensitivity; lower modulus fiber goes in the butt for durability and impact resistance under load. This engineering is why a well-designed 30-ton blank can outperform a poorly designed 40-ton blank. The fiber matters less than how it is used.
Torsional Rigidity
When a blank loads under the weight of a fish or a heavy lure, it wants to go oval in cross-section — which bleeds power and dulls feel. Adding diagonal fiber layers, or using helical wrapping geometry, resists this twist without adding weight. A blank that maintains its cross-section under load transmits more power from angler to fish and more sensation back the other way.
Resin Systems
The resin binding carbon fibers together is the least glamorous part of blank construction and one of the most consequential. Less resin means lighter blanks and higher fiber density — but only if the resin is strong enough to do its job with less of it. Modern resin systems achieve meaningful reductions in resin-to-fiber ratio compared to standard construction. When a manufacturer specifies their resin system rather than only their fiber grade, that's a sign they understand where performance actually comes from.
4. Choosing the Right Blank for Your Rod
Blank action is defined by how much of the blank bends under casting load:
-
Extra-fast: top 25% bends
-
Fast: top 33% bends
-
Moderate: top 50% bends
-
Slow: progressive curve along the full length into the grips
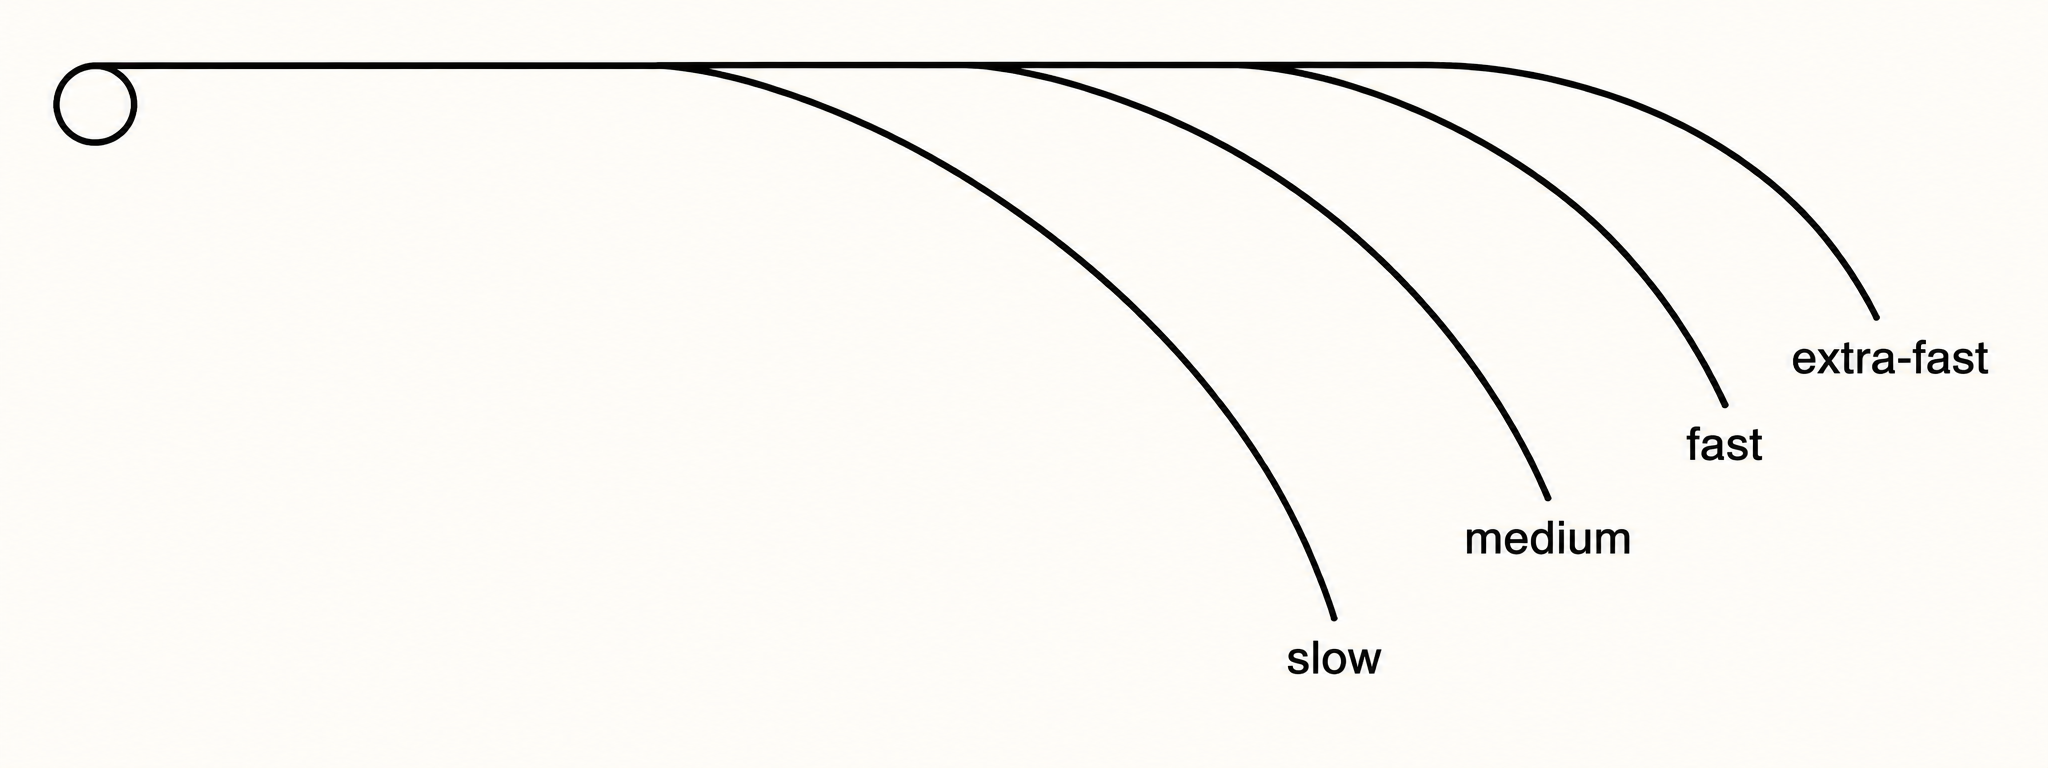
These actions result from taper design. A straight taper adds fiber to the wall at an even geometric rate from tip to butt, producing slow to moderate actions. A compound taper changes the rate of fiber addition at one or more points along the length, enabling fast or extra-fast actions while preserving power in the lower blank.
Judging a blank's action before you build:
Hold the blank parallel to the floor with the butt firmly against your stomach. Begin a side-to-side motion with minimum pressure, gradually increasing to maximum. The curvature you observe under progressively heavier loads gives you the most honest picture of true action — more informative than any static bend test, because rods are dynamic instruments governed by acceleration, momentum, and rotation, not static weight.
You can also feel for "drops" — points where wall thickness changes rapidly. Run a thin, slippery piece of synthetic cloth between your thumb and forefinger along the blank. Rapid changes in taper can often be felt as small jumps. These drops tell you where compound taper transitions occur, which is critical if you're considering trimming.
Blank-to-blank variation exists even within the same model from the same manufacturer. Patterns may be wrapped slightly higher or lower on the mandrel; trimming occurs at slightly different points. Evaluate each blank individually as you build — this is one of the genuine advantages of custom work.
See more in the dedicated RodSmith article: Rod Action vs Power Explained: How to Choose the Right Blank
5. Locating and Aligning the Spine
Every blank has an effective spine — a point around the circumference that is detectably more rigid than the rest. It exists because of the cumulative effect of countless small variations in production: how tightly the pattern was wrapped, slight variations in curing pressure, small irregularities in sanding. The spine migrates somewhat along the blank's length; what you detect is the average of many forces.
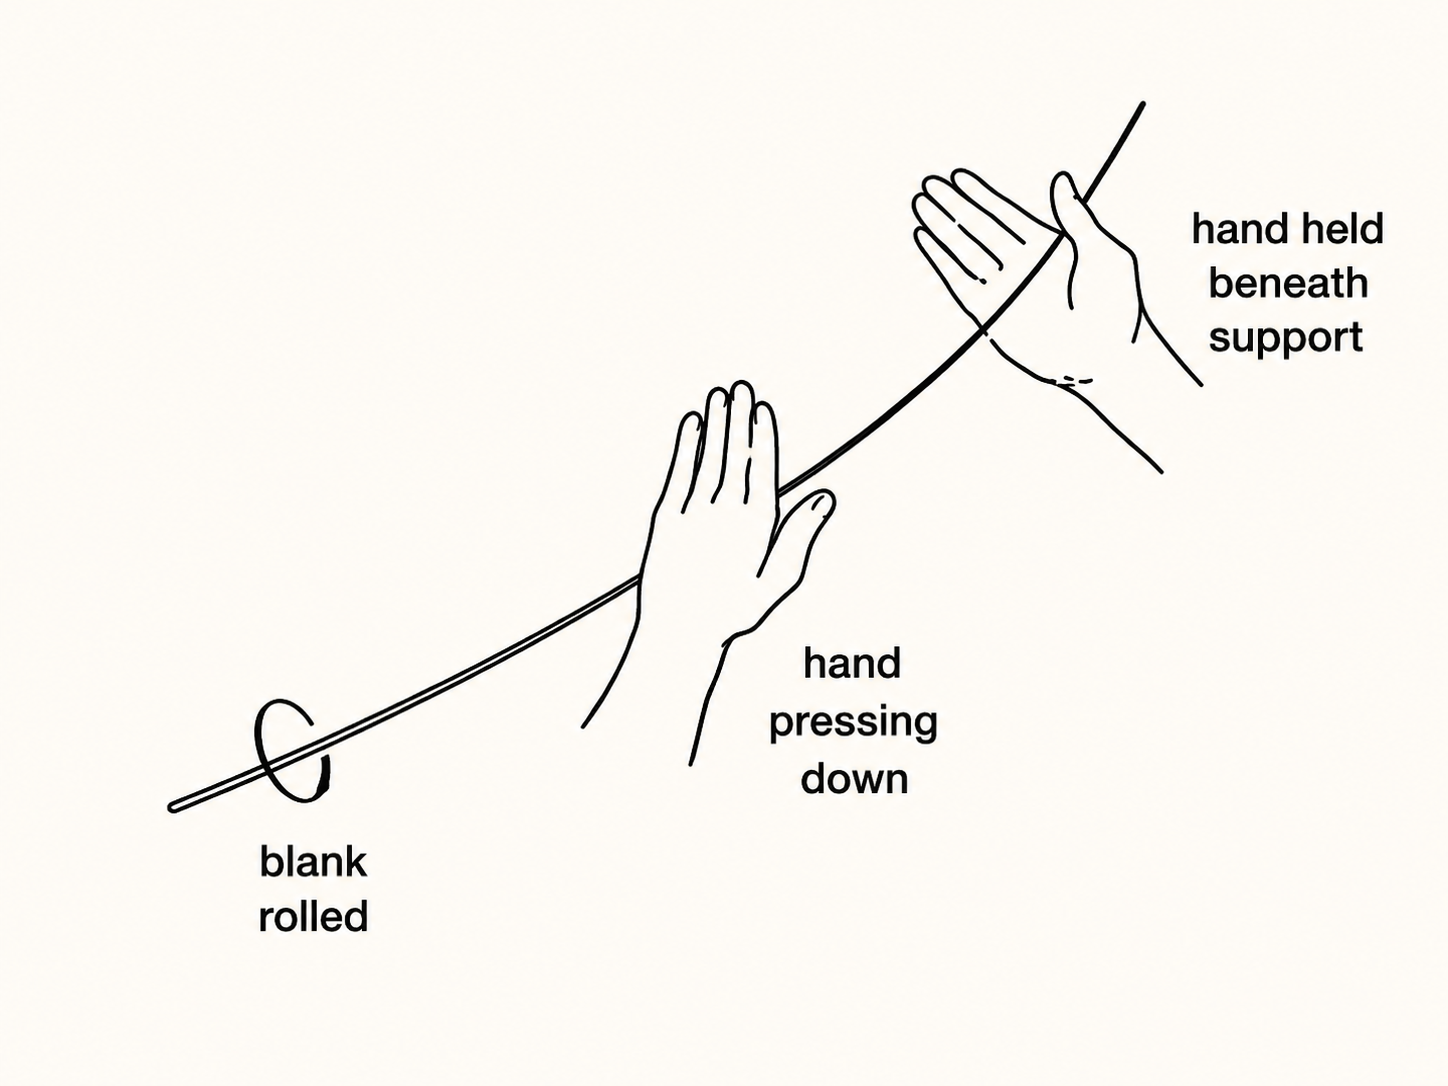
Finding the spine:
Rest the butt on a smooth, hard surface and support the very tip end of the blank in your open palm. Press down the middle with the fingers of the other hand while slowly rolling the blank back and forth. A point of increased resistance — a subtle jump — is the spine. The supporting hand must be at the tip end to get the average across the full blank length.
Why alignment matters:
When a fish loads a rod, the blank wants to rotate until the spine is on top. If guides are wrapped in the wrong position, the blank twists against the angler's grip, wasting energy and making the fish harder to fight. On the cast, the lure weight loads the tip toward the water; on the forward cast, away from it. Alignment for optimal casting accuracy and optimal fish-fighting are precisely 180 degrees apart — so the builder has to decide which matters more for each specific rod.
Rod TypeEffective Spine PositionBoat and trolling rodsTop (opposite water)Saltwater spinningTopSaltwater flyTopFreshwater spinningUndersideFreshwater flyUndersideBaitcastingTop
Baitcasting rods favor fish-fighting alignment because the casts are typically short with a stiff blank — torsional forces from the cast are manageable — but a hooked fish benefits immediately from spine stability.
6. Ferrules and Multi-Piece Construction
Graphite-to-Graphite Ferrules
Most modern multi-piece rods use tip-over-butt ferrules where one tapered section fits into another. The connection is a friction lock — no friction occurs until the taper jams against the other, at which point the lock engages within a very small amount of travel.
Joining: Bring the sections together misaligned by 90 degrees. As you feel the tapers make contact, simultaneously push and twist to bring them into alignment. This twisting force is critical — it creates the friction lock. Pushing straight in without twisting risks the tip section flying off during the cast and accelerates wear at the joint.
Separating: Reverse the process — pull while rotating. The sections will feel firmly bound, then release almost instantaneously.
Female ferrule reinforcement: Wrap the female ferrule with size "00" or "A" thread for additional hoop strength. Use the same thread tension as guide wraps — no tighter, or you risk constricting the ferrule opening. An under-seated ferrule creates a shear point and is a common cause of rod breakage.
Travel and Multi-Piece Rods
For rods that need to pack into airline-friendly cases, four-piece is the most practical configuration for most rod lengths. The three main ferrule approaches each make a different tradeoff:
Spigot ferrules (an internal plug that one section slides over) come closest to one-piece feel because the joint is inside the blank wall rather than overlapping it. They require precision fitting but deliver the cleanest action transition.
Tip-over-butt sleeves (the standard on most production multi-piece rods) are simpler, typically stronger, and more tolerant of wear. The overlap creates a slight stiffness at the ferrule point that good blank designers account for in their taper.
Push-fit joints without a locking taper work well on lighter rods where the joint can be snugged up firmly without the twist-lock mechanism. Less critical alignment is required on each assembly.
Regardless of ferrule type, the care taken during assembly is what determines how a multi-piece rod performs and how long the joints last.
7. Modifying Blanks: Trimming and Tuning
One of the most powerful skills in custom rod building is the ability to modify a blank's performance by trimming it, then further tune the action through guide selection and placement. Use it deliberately — only when no available blank already meets the need.
Trimming the Tip
Removing length from the tip always stiffens the blank. The rod will no longer cast as light a lure or line as originally designed. On straight tapers, the stiffening is proportional — each inch removed adds approximately equal stiffness. On compound tapers, changes can be sudden and dramatic. An extra-fast blank has a limber tip joined to a stiff lower section; remove even half of the limber tip and the blank's casting character changes fundamentally. Work in small increments, test with temporarily taped guides, and take notes.
Trimming the Butt
Trimming the butt slows the action without changing the lure-weight range. The lure range is a function of the tip section, which is unchanged. Simple arithmetic illustrates: take an extra-fast 8-foot blank where the top 25% (2 feet) bends. Cut 1 foot from the butt, and the same 2-foot tip section now represents 29% of a 7-foot rod — action midway between extra-fast and fast.
Modifying Action Through Guide Selection
Four variables govern how guides affect blank action:
1. Guide weight. Heavier guides slow the action; lighter guides keep it fast and responsive. To slow a blank slightly, use heavier guides or add one or two extra guides near the tip. To keep action crisp, use the lightest guides available and the minimum number needed to distribute stress.
2. Guide rigidity. A single-foot guide offers almost no resistance to blank bending — the finished rod acts most like the bare blank. A rigid two-foot guide adds stiffness at its mounting point. If you want to stiffen the tip section, use two-foot guides with rigid construction.
3. Guide foot length. The guide feet are held tightly against the blank by the thread wrap, acting like a splint. Longer feet mean more stiffness. On rods where you want maximum blank freedom, grind feet as short as practical.
4. Wrap length. A thread wrap covered in finish adds hoop strength to the blank beneath it, preventing the blank from going oval under load — effectively stiffening it. Extending wraps beyond the guide feet adds stiffness in proportion to the extension. This is a real, measurable effect, especially on lighter blanks.
8. Glues and Gluing: The Foundation of a Lasting Rod
The single most critical factor in a fishing rod's long-term performance is not the blank, not the guides, not the reel seat — it's how the rod is assembled. A loose foregrip or a failed reel-seat joint can ruin a fight with a fish of a lifetime. There are no shortcuts here.
The Right Glue for Permanent Bonds
For virtually every assembly on a custom rod — reel seats, grips, handles, gimbals — the correct adhesive is slow-cure epoxy: the type that sets in approximately two hours and achieves full cure over 36–48 hours. Quick-setting (5-minute) epoxies are substantially weaker and brittle. Do not substitute them.
Epoxy cures by catalytic reaction between the two mixed parts, not by solvent evaporation. In a tight-fitting joint, air cannot reach the interior, and evaporative glues may never fully cure. Epoxy neither shrinks nor requires clamping pressure. It only requires that parts remain undisturbed during the initial set.
Mixing: Use equal parts by volume. Mix for a minimum of two minutes using linear strokes from the outside inward, followed by circular strokes. Thorough mixing is the single most common variable in epoxy joint failures.
Surface Preparation: The Non-Negotiable Step
The most important factor in any epoxy bond is surface preparation. On smooth, polished surfaces, the bond will fail — not immediately, but under sustained load.
For blanks: Use coarse sandpaper across the blank in multiple directions — along the axis, across it, and at 45-degree angles. Cut through the factory finish into the surface of the glass or graphite. Wipe clean with alcohol.
For reel seats: Scratch the inside surface thoroughly in multiple directions with a tapered reamer or coarse sandpaper on a dowel. Wipe with solvent.
For cork: Natural cork is porous enough that additional roughening is less critical, but always score the inside of cork arbors with a triangular file — six to eight longitudinal grooves create locks that prevent rotation.
After roughening, degrease all surfaces with alcohol or acetone. This step is as important as the roughening itself.
Fitting and Application
For epoxy, the fit should be easy, not tight. A too-tight fit forces epoxy out of the joint, leaving insufficient adhesive. Coat the fixed surface with a generous layer of mixed epoxy, then slide the uncoated component over it with a continuous rotating motion — this spreads glue into all scratches and pores. Remove excess epoxy with a popsicle stick before the part fully seats; what remains is a small bead at the glue line, easily wiped with a textured rag.
Parts do not need clamping but must not be moved while setting. Give thought to rod position during cure — a butt cap or ferrule should be glued with the rod vertical.
Paste-Type Epoxy for Maximum Strength
When gaps are larger than ideal — a reel seat that doesn't perfectly match the blank diameter — non-flowing paste-type epoxy fills the space without flowing out. It has nearly three times the shear strength of standard epoxy. Use masking-tape bands at each end of the area to center the blank, fill the space completely, and slide the seat into place. This is the strongest possible installation method for any rod that will face sustained heavy load.
9. Reel Seats: Materials, Types, and Installation
Composite Reel Seats
Composite graphite-and-resin seats paired with stainless steel hoods are fully corrosion-resistant in both fresh and saltwater — where anodized aluminum seats will eventually corrode through scratches and chrome-plated brass seats require meticulous cleaning after every saltwater outing. Quality composite seats have grooved interiors for better glue bonding, nylon-lined hoods that conform to a wide range of reel foot shapes and eliminate electrolytic contact between metals, and square-cut threads deeper and to closer tolerances than V-threads.
Some builds call for a seat body minimal enough that you feel blank vibrations through it directly — skeletal and cutaway designs push this to its logical conclusion, placing your hand nearly on the blank itself. These suit freshwater finesse rods. Full-bodied seats with positive locking nut systems belong on saltwater and big-game rods where a reel must not move under any load.
Aluminum and Nickel Silver
Aluminum remains the preferred material for fly-rod seats. Higher aluminum-content alloys machine more slowly but are more corrosion-resistant and anodize more thoroughly. A milled slot the full length of the seat body does the best job of holding the reel foot and reducing side pressure on the hoods — it requires thicker walls and an additional machining operation, and it's worth the cost.
Nickel silver — about three times the strength of aluminum, with self-lubricating thread properties and a warm white-gold finish — is the traditional choice for high-end fly rods and pairs particularly well with wood insert seats. It machines to tighter tolerances than aluminum, making for hoods and threads that remain smooth and precise after years of use.
Mounting
The inside diameter of most reel seats is substantially larger than the blank. The blank must be centered using bushings. Cork bushings are the standard approach for most applications — available in assorted diameters, easy to file and taper-ream, adequate for freshwater and light saltwater. High-density synthetic bushing materials transmit vibration better than cork and suit sensitivity-focused builds. For maximum strength on any rod that will face serious load, the strongest method is paste-type epoxy fill: masking-tape bands at each end to center and support the blank, the entire space between packed with epoxy before the seat slides into place.
10. Grips and Handles
Cork
Cork remains the benchmark grip material for most rod types: light, warm, handles moisture gracefully, and transmits vibration better than any foam alternative. Premium grades with minimal pits are worth the investment for any rod you'll rely on. When pits appear during shaping — and they will — fill them before final sanding by pressing a paste of cork dust and cork filler adhesive into each pit. Pits left unfilled at the edge of the hole will crumble with use.
Building a grip from individual cork rings glued directly to the blank is stronger than taper-reaming a preformed grip, because each short ring needs to fit only a half-inch of blank length — a perfect fit is easy to achieve. Rings are glued simultaneously to the blank and to each other; after curing, the assembled grip is shaped.
EVA Foam
EVA foam handles the conditions cork cannot — sustained saltwater exposure, hard use in rough environments, repeated wet-and-dry cycles. It's durable, UV-resistant, easy to shape, and available in densities and colors to suit any build. It lacks cork's vibration transmission and warmth in hand, but for a rod spending its life in the surf or offshore, that tradeoff is straightforward.
Split Grip Designs
A split grip — two separate grip sections with exposed blank between them — reduces weight and improves sensitivity by letting you feel blank vibrations through the section your hand contacts directly. It's the right choice for any build where sensitivity and weight matter: bass rods, light spinning rods, kayak rods. Full-length grips remain appropriate for surf, offshore, and fly rods, where leverage and comfort during extended fights outweigh the sensitivity advantage.
Counterbalancing
Many spinning and fly rods feel slightly tip-heavy with a reel mounted. Tip heaviness is tiring — not from total weight, but from the imbalance that pulls forward on the retrieve and during long casting sessions. The fix is to add weight inside the butt before gluing on the butt cap.
Tungsten putty — non-toxic, roughly 1.7 times heavier than lead — allows a small counterweight to have real effect. Pinch off an estimate, mount the reel, check the balance, and adjust. When you're satisfied, roll the putty into a tube slightly larger than the blank's inside diameter, coat the blank interior with epoxy, press the putty in, and glue the butt cap. Stand the rod vertically overnight so the epoxy seals the putty in place permanently.
11. Guides: Selection, Placement, and How They Shape Action
Guide Materials
Modern ceramic guide rings — aluminum oxide, silicon carbide (SiC), and similar materials — resist grooving from any line type indefinitely. SiC is the right choice for any rod running heavy braid under sustained load: it's harder than aluminum oxide and dissipates heat better, which matters when a large fish takes drag over a long fight.
Ring size decreases from butt to tip, managing line flow off the reel and reducing friction throughout the cast and retrieve. Oversized guides near the tip add unnecessary weight at the worst possible location; undersized guides create friction. Match ring size to the line diameter and lure weight the rod will actually fish.
Single-Foot vs. Two-Foot Guides
A single-foot guide offers almost no resistance to blank bending — the finished rod behaves as close to the bare blank as possible. A two-foot guide adds stiffness at its mounting point. For sensitivity-focused builds, single-foot guides preserve feel. For rods where you're deliberately stiffening the tip section, two-foot guides with rigid construction are your tool. The choice compounds across all the guides on the rod — choose deliberately.
Shape-Memory Alloy Frames
Nickel-titanium (nitinol) guide frames — where the frame itself serves as the ring, with no separate ceramic insert — offer a different tradeoff worth knowing: they bend back to their original shape after being stepped on, have no insert to crack or loosen, and the alloy polishes smoother with use over time. They suit rods that take rough handling. The line runs directly on metal rather than ceramic, which is adequate for most line types but not optimal for the heaviest braid applications where SiC's thermal properties matter.
12. Spiral Guide Placement
In spiral guide placement, guides transition the line from the top of the blank near the reel to the bottom at the tip, rotating 180 degrees across several guides. The running guides and tip-top end up on the underside of the rod.
The reason: under load, a conventionally guided rod applies the line's tension to the top of the blank — the side under extension — which tends to cause the blank to twist. Spiral placement routes the line to the blank's underside, the side under compression. The blank loads more cleanly, stays straighter under heavy fish pressure, and transmits more force directly to the angler.
Practical advantages for the builder: fewer guides are often needed, reducing total tip weight. The rod typically handles a wider range of line weights without the tip collapsing under heavy load. It's particularly effective for heavy saltwater applications and offshore jigging, where blank stability under sustained load matters more than it does in freshwater casting.
Standard guide spacing charts do not apply to spiral placement. Position is determined by taping guides to the blank, casting, and adjusting — each blank behaves differently and there is no universal formula.
13. Wrapping Guides: Technique and Thread Selection
The guide wrap is where the craft becomes visible. A well-executed wrap has even, tight threads with no gaps, no overlaps, and no crossings. It takes practice — allow time to develop the skill before wrapping the final rod.
Thread Selection
Rod-building thread is sold by size (A, D, E — finest to heaviest) and material. For most applications:
- Size A: Lightweight rods, all freshwater applications, guides with small feet
- Size D or E: Saltwater rods, larger guides, heavy-duty applications
- NCP (no-color-preservative) thread: Turns translucent when finish is applied, revealing the blank color through the wrap — a distinctive look
- Color-preserved thread: Retains its original color under finish
Consistent tension is more important than high tension. Uneven tension causes thread to ride up over itself, creating ridges that no amount of finishing will hide.
The Wrapping Process
- Start the wrap by laying the thread end under the first few turns — this locks the end without a knot. Leave a tag.
- Wrap toward the guide, maintaining even tension and touching each turn tightly against the previous one.
- To finish, lay a loop of thread on the blank under the last several turns. Pass the working thread through the loop, then pull the tag ends to draw the loop and working thread under the wrap. Trim close.
- Verify guide alignment after wrapping the first foot before committing to the second.
Decorative Wraps
Diamond wraps, chevron patterns, closed-wrap crossings, and thread weaves have been developed by custom builders over decades. They require mastery of basic wrapping, careful color selection, and often multiple thread colors worked simultaneously. They are the visible signature of the craftsman — the thing that tells anyone who picks up the rod that it was built by a person with skill and intention.
14. Finishing Your Rod
Thread wraps must be protected with a finish to prevent fraying, water infiltration, and UV degradation.
Two-part epoxy finish is the standard — applied in one or two thin coats, cured to a clear, glossy, hard surface. Apply with a small brush, rotating the rod on a motor-driven dryer at low RPM to prevent sagging. Cure the first coat overnight, sand lightly with 400-grit to remove any imperfections, then apply the second coat.
Water-based polymer finishes cure without rotation or mixing, with built-in UV protection. They produce a thinner, slightly softer coat than epoxy but are simpler to apply and work well for builders who wrap infrequently.
Common problems and fixes:
- Bubbles: Insufficient mixing, or applying over dust. Sand out after curing and apply another thin coat.
- Sagging or drips: Rod rotating too slowly or finish too thick. Increase rotation speed.
- Cloudy finish: High humidity during application. Work in warm, dry conditions.
Winding Checks
A winding check is the small ring placed at the forward end of the grip where it meets the blank. It covers the transition, prevents the grip edge from fraying, and provides a clean visual termination. Size it to fit snugly on the blank at that point and glue with slow-cure epoxy.
15. Building for Specific Techniques
Some fishing techniques place specific demands on rod geometry that are worth understanding before you choose a blank and components.
Bait finesse (BFS) — ultralight lures on baitcasting gear — demands a reflexive tip that loads under weights as light as 1/32 oz with enough backbone to control a fish. Blank selection matters more here than in almost any other application: the tip must be delicate enough to load under almost no weight but recover quickly and cleanly. Taper-reaming the tip slightly or selecting a blank one power rating lighter than seems intuitive are both valid starting points.
Slow pitch jigging requires a rod that imparts action on the upstroke while the jig flutters freely on the fall. The rod needs a specific parabolic action and a recovery speed tuned to the jig weight being fished. Building for slow pitch means choosing a blank whose action is already close, then tuning the guide selection to preserve — not mask — that action.
Kayak fishing puts a premium on shorter rods and careful balance. The seated casting position changes the ideal balance point relative to a standing cast, and a rod that feels neutral standing will often feel tip-heavy from a seat. Build the balance point slightly rearward of what you'd use standing, and test it seated before committing the butt cap.
Surf and distance casting amplifies every weight decision. On a 12-foot surf rod, component weight saved near the tip multiplies across the lever arm of the cast. Guide selection, thread size, and finish coat weight are all worth considering more carefully than on a 7-foot bass rod.
16. Final Assembly Checklist
Before the first cast, verify:
- Spine alignment confirmed and guides positioned correctly for the rod's primary application
- All glue joints fully cured — minimum 36–48 hours for slow-cure epoxy
- Reel seat firmly mounted with no rotation under hand pressure
- Grips seated fully with no gaps at either end
- Ferrule fit checked — tip section seats fully with a firm twist-lock, no play
- Female ferrule wrap applied with correct thread tension
- All guides aligned along the spine-reference line, or spiral placement verified
- All guide wraps finished with two coats of thread finish, fully cured
- Tip-top aligned with guides
- Counterbalance weight installed if applicable
- Butt cap epoxied and rod stood vertically overnight
Fish it. Then build the next one.
A Final Word on Quality
Every stage of custom rod building offers a choice between adequate and excellent. A reel seat that almost holds a reel, a glue joint that just barely bonds a smooth surface, a thread wrap applied with careless tension — each of these choices compounds. The rod that results may look fine on the bench and fail at the worst possible moment.
The custom rod builder's real skill is not in any single technique. It's in the discipline of choosing quality at every stage — quality materials, quality preparation, quality execution — and understanding why each choice matters. A rod built this way won't just perform better than anything off a factory shelf. It will outlast it by decades, and it will be yours in a way no production rod ever could be.
That's the point.
Have questions about any stage of the build process? The Rodsmith community is the right place to ask. Post in the discussions, share your builds, and contribute to a craft that has been advancing through exactly this kind of shared knowledge for generations.